
Microsoft regularly releases both updates for Windows Server. To ensure your servers can receive future updates, including security updates, it's important to keep your servers updated. Check out for a complete list of released updates.
This section contains advanced troubleshooting topics and links to help you resolve issues with Windows 10 in an enterprise or IT pro environment. Additional topics will be added as they become available.
Troubleshoot 802.1x Authentication
Overview
This is a general troubleshooting of 802.1X wireless and wired clients. With 802.1X and wireless troubleshooting, it's important to know how the flow of authentication works, and then figuring out where it's breaking. It involves a lot of third party devices and software. Most of the time, we have to identify where the problem is, and another vendor has to fix it. Since we don't make access points or switches, it won't be an end-to-end Microsoft solution.
Scenarios
This troubleshooting technique applies to any scenario in which wireless or wired connections with 802.1X authentication is attempted and then fails to establish. The workflow covers Windows 7 - 10 for clients, and Windows Server 2008 R2 - 2012 R2 for NPS.
Known Issues
None
Data Collection
Troubleshooting
Viewing NPS authentication status events in the Windows Security event log is one of the most useful troubleshooting methods to obtain information about failed authentications.
NPS event log entries contain information on the connection attempt, including the name of the connection request policy that matched the connection attempt and the network policy that accepted or rejected the connection attempt. If you are not seeing both success and failure events, see the section below on NPS audit policy.
Check Windows Security Event log on the NPS Server for NPS events corresponding to rejected (event ID 6273) or accepted (event ID 6272) connection attempts.
The WLAN AutoConfig operational log lists information and error events based on conditions detected by or reported to the WLAN AutoConfig service. The operational log contains information about the wireless network adapter, the properties of the wireless connection profile, the specified network authentication, and, in the event of connectivity problems, the reason for the failure. For wired network access, Wired AutoConfig operational log is equivalent one.
On the client side, navigate to Event Viewer (Local)\Applications and Services Logs\Microsoft\Windows\WLAN-AutoConfig/Operational for wireless issues. For wired network access issues, navigate to ..\Wired-AutoConfig/Operational. See the following example:

Most 802.1X authentication issues are due to problems with the certificate that is used for client or server authentication (e.g. invalid certificate, expiration, chain verification failure, revocation check failure, etc.).
First, validate the type of EAP method being used:
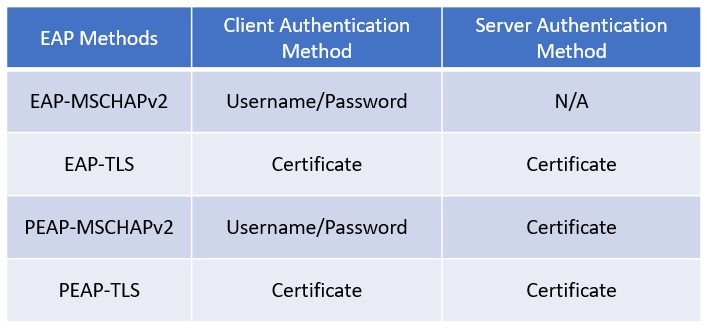
If a certificate is used for its authentication method, check if the certificate is valid. For server (NPS) side, you can confirm what certificate is being used from the EAP property menu. In NPS snap-in, go to Policies > Network Policies. Right click on the policy and select Properties. In the pop-up window, go to the Constraints tab and select the Authentication Methods section.

The CAPI2 event log will be useful for troubleshooting certificate-related issues. This log is not enabled by default. You can enable this log by expanding Event Viewer (Local)\Applications and Services Logs\Microsoft\Windows\CAPI2, right-clicking Operational and then clicking Enable Log.
Data collection for troubleshooting 802.1X authentication
Use the following steps to collect data that can be used to troubleshoot 802.1X authentication issues. When you have collected data, see Advanced troubleshooting 802.1X authentication.
Capture wireless/wired functionality logs
Use the following steps to collect wireless and wired logs on Windows and Windows Server:
- Create C:\MSLOG on the client machine to store captured logs.
- Launch an elevated command prompt on the client machine, and run the following commands to start a RAS trace log and a Wireless/Wired scenario log.Wireless Windows 8.1 and Windows 10:
netsh ras set tracing * enabled
netsh trace start scenario=wlan,wlan_wpp,wlan_dbg,wireless_dbg globallevel=0xff capture=yes maxsize=1024 tracefile=C:\MSLOG\%COMPUTERNAME%_wireless_cli.etl
Wireless Windows 7 and Windows 8:netsh ras set tracing * enabled netsh trace start scenario=wlan,wlan_wpp,wlan_dbg globallevel=0xff capture=yes maxsize=1024 tracefile=C:\MSLOG\%COMPUTERNAME%_wireless_cli.etl
Wired client, regardless of versionnetsh ras set tracing * enabled netsh trace start scenario=lan globallevel=0xff capture=yes maxsize=1024 tracefile=C:\MSLOG\%COMPUTERNAME%_wired_cli.etl - Run the following command to enable CAPI2 logging and increase the size :
wevtutil.exe sl Microsoft-Windows-CAPI2/Operational /e:true wevtutil sl Microsoft-Windows-CAPI2/Operational /ms:104857600 - Create C:\MSLOG on the NPS to store captured logs.
- Launch an elevated command prompt on the NPS server and run the following commands to start a RAS trace log and a Wireless/Wired scenario log:Windows Server 2012 R2, Windows Server 2016 wireless network:
netsh ras set tracing * enabled
netsh trace start scenario=wlan,wlan_wpp,wlan_dbg,wireless_dbg globallevel=0xff capture=yes maxsize=1024 tracefile=C:\MSLOG\%COMPUTERNAME%_wireless_nps.etl
Windows Server 2008 R2, Windows Server 2012 wireless networknetsh ras set tracing * enabled netsh trace start scenario=wlan,wlan_wpp,wlan_dbg globallevel=0xff capture=yes maxsize=1024 tracefile=C:\MSLOG\%COMPUTERNAME%_wireless_nps.etl
Wired networknetsh ras set tracing * enabled netsh trace start scenario=lan globallevel=0xff capture=yes maxsize=1024 tracefile=C:\MSLOG\%COMPUTERNAME%_wired_nps.etl - Run the following command to enable CAPI2 logging and increase the size :
wevtutil.exe sl Microsoft-Windows-CAPI2/Operational /e:true wevtutil sl Microsoft-Windows-CAPI2/Operational /ms:104857600 - Run the following command from the command prompt on the client machine and start PSR to capture screen images:NoteWhen the mouse button is clicked, the cursor will blink in red while capturing a screen image.
psr /start /output c:\MSLOG\%computername%_psr.zip /maxsc 100 - Repro the issue.
- Run the following command on the client PC to stop the PSR capturing:
psr /stop - Run the following commands from the command prompt on the NPS server.
- To stop RAS trace log and wireless scenario log:
netsh trace stop netsh ras set tracing * disabled - To disable and copy CAPI2 log:
wevtutil.exe sl Microsoft-Windows-CAPI2/Operational /e:false
wevtutil.exe epl Microsoft-Windows-CAPI2/Operational C:\MSLOG\%COMPUTERNAME%_CAPI2.evtx
- Run the following commands on the client PC.
- To stop RAS trace log and wireless scenario log:
netsh trace stop netsh ras set tracing * disabled - To disable and copy the CAPI2 log:
wevtutil.exe sl Microsoft-Windows-CAPI2/Operational /e:false
wevtutil.exe epl Microsoft-Windows-CAPI2/Operational C:\MSLOG\%COMPUTERNAME%_CAPI2.evtx
- Save the following logs on the client and the NPS:Client
- C:\MSLOG%computername%_psr.zip
- C:\MSLOG%COMPUTERNAME%_CAPI2.evtx
- C:\MSLOG%COMPUTERNAME%_wireless_cli.etl
- C:\MSLOG%COMPUTERNAME%_wireless_cli.cab
- All log files and folders in %Systemroot%\Tracing
NPS- C:\MSLOG%COMPUTERNAME%_CAPI2.evtx
- C:\MSLOG%COMPUTERNAME%_wireless_nps.etl (%COMPUTERNAME%_wired_nps.etl for wired scenario)
- C:\MSLOG%COMPUTERNAME%_wireless_nps.cab (%COMPUTERNAME%_wired_nps.cab for wired scenario)
- All log files and folders in %Systemroot%\Tracing
Save environment and configuration information
On Windows client
- Create C:\MSLOG to store captured logs.
- Launch a command prompt as an administrator.
- Run the following commands.
- Environment information and Group Policy application status
gpresult /H C:\MSLOG\%COMPUTERNAME%_gpresult.htm msinfo32 /report c:\MSLOG\%COMPUTERNAME%_msinfo32.txt ipconfig /all > c:\MSLOG\%COMPUTERNAME%_ipconfig.txt route print > c:\MSLOG\%COMPUTERNAME%_route_print.txt- Event logs
wevtutil epl Application c:\MSLOG\%COMPUTERNAME%_Application.evtx wevtutil epl System c:\MSLOG\%COMPUTERNAME%_System.evtx wevtutil epl Security c:\MSLOG\%COMPUTERNAME%_Security.evtx wevtutil epl Microsoft-Windows-GroupPolicy/Operational C:\MSLOG\%COMPUTERNAME%_GroupPolicy_Operational.evtx wevtutil epl "Microsoft-Windows-WLAN-AutoConfig/Operational" c:\MSLOG\%COMPUTERNAME%_Microsoft-Windows-WLAN-AutoConfig-Operational.evtx wevtutil epl "Microsoft-Windows-Wired-AutoConfig/Operational" c:\MSLOG\%COMPUTERNAME%_Microsoft-Windows-Wired-AutoConfig-Operational.evtx wevtutil epl Microsoft-Windows-CertificateServicesClient-CredentialRoaming/Operational c:\MSLOG\%COMPUTERNAME%_CertificateServicesClient-CredentialRoaming_Operational.evtx wevtutil epl Microsoft-Windows-CertPoleEng/Operational c:\MSLOG\%COMPUTERNAME%_CertPoleEng_Operational.evtx- For Windows 8 and later, also run these commands for event logs:
wevtutil epl Microsoft-Windows-CertificateServicesClient-Lifecycle-System/Operational c:\MSLOG\%COMPUTERNAME%_CertificateServicesClient-Lifecycle-System_Operational.evtx wevtutil epl Microsoft-Windows-CertificateServicesClient-Lifecycle-User/Operational c:\MSLOG\%COMPUTERNAME%_CertificateServicesClient-Lifecycle-User_Operational.evtx wevtutil epl Microsoft-Windows-CertificateServices-Deployment/Operational c:\MSLOG\%COMPUTERNAME%_CertificateServices-Deployment_Operational.evtx- Certificates Store information:
certutil -v -silent -store MY > c:\MSLOG\%COMPUTERNAME%_cert-Personal-Registry.txt certutil -v -silent -store ROOT > c:\MSLOG\%COMPUTERNAME%_cert-TrustedRootCA-Registry.txt certutil -v -silent -store -grouppolicy ROOT > c:\MSLOG\%COMPUTERNAME%_cert-TrustedRootCA-GroupPolicy.txt certutil -v -silent -store -enterprise ROOT > c:\MSLOG\%COMPUTERNAME%_TrustedRootCA-Enterprise.txt certutil -v -silent -store TRUST > c:\MSLOG\%COMPUTERNAME%_cert-EnterpriseTrust-Reg.txt certutil -v -silent -store -grouppolicy TRUST > c:\MSLOG\%COMPUTERNAME%_cert-EnterpriseTrust-GroupPolicy.txt certutil -v -silent -store -enterprise TRUST > c:\MSLOG\%COMPUTERNAME%_cert-EnterpriseTrust-Enterprise.txt certutil -v -silent -store CA > c:\MSLOG\%COMPUTERNAME%_cert-IntermediateCA-Registry.txt certutil -v -silent -store -grouppolicy CA > c:\MSLOG\%COMPUTERNAME%_cert-IntermediateCA-GroupPolicy.txt certutil -v -silent -store -enterprise CA > c:\MSLOG\%COMPUTERNAME%_cert-Intermediate-Enterprise.txt certutil -v -silent -store AuthRoot > c:\MSLOG\%COMPUTERNAME%_cert-3rdPartyRootCA-Registry.txt certutil -v -silent -store -grouppolicy AuthRoot > c:\MSLOG\%COMPUTERNAME%_cert-3rdPartyRootCA-GroupPolicy.txt certutil -v -silent -store -enterprise AuthRoot > c:\MSLOG\%COMPUTERNAME%_cert-3rdPartyRootCA-Enterprise.txt certutil -v -silent -store SmartCardRoot > c:\MSLOG\%COMPUTERNAME%_cert-SmartCardRoot-Registry.txt certutil -v -silent -store -grouppolicy SmartCardRoot > c:\MSLOG\%COMPUTERNAME%_cert-SmartCardRoot-GroupPolicy.txt certutil -v -silent -store -enterprise SmartCardRoot > c:\MSLOG\%COMPUTERNAME%_cert-SmartCardRoot-Enterprise.txt certutil -v -silent -store -enterprise NTAUTH > c:\MSLOG\%COMPUTERNAME%_cert-NtAuth-Enterprise.txt certutil -v -silent -user -store MY > c:\MSLOG\%COMPUTERNAME%_cert-User-Personal-Registry.txt certutil -v -silent -user -store ROOT > c:\MSLOG\%COMPUTERNAME%_cert-User-TrustedRootCA-Registry.txt certutil -v -silent -user -store -enterprise ROOT > c:\MSLOG\%COMPUTERNAME%_cert-User-TrustedRootCA-Enterprise.txt certutil -v -silent -user -store TRUST > c:\MSLOG\%COMPUTERNAME%_cert-User-EnterpriseTrust-Registry.txt certutil -v -silent -user -store -grouppolicy TRUST > c:\MSLOG\%COMPUTERNAME%_cert-User-EnterpriseTrust-GroupPolicy.txt certutil -v -silent -user -store CA > c:\MSLOG\%COMPUTERNAME%_cert-User-IntermediateCA-Registry.txt certutil -v -silent -user -store -grouppolicy CA > c:\MSLOG\%COMPUTERNAME%_cert-User-IntermediateCA-GroupPolicy.txt certutil -v -silent -user -store Disallowed > c:\MSLOG\%COMPUTERNAME%_cert-User-UntrustedCertificates-Registry.txt certutil -v -silent -user -store -grouppolicy Disallowed > c:\MSLOG\%COMPUTERNAME%_cert-User-UntrustedCertificates-GroupPolicy.txt certutil -v -silent -user -store AuthRoot > c:\MSLOG\%COMPUTERNAME%_cert-User-3rdPartyRootCA-Registry.txt certutil -v -silent -user -store -grouppolicy AuthRoot > c:\MSLOG\%COMPUTERNAME%_cert-User-3rdPartyRootCA-GroupPolicy.txt certutil -v -silent -user -store SmartCardRoot > c:\MSLOG\%COMPUTERNAME%_cert-User-SmartCardRoot-Registry.txt certutil -v -silent -user -store -grouppolicy SmartCardRoot > c:\MSLOG\%COMPUTERNAME%_cert-User-SmartCardRoot-GroupPolicy.txt certutil -v -silent -user -store UserDS > c:\MSLOG\%COMPUTERNAME%_cert-User-UserDS.txt- Wireless LAN client information:
netsh wlan show all > c:\MSLOG\%COMPUTERNAME%_wlan_show_all.txt netsh wlan export profile folder=c:\MSLOG\- Wired LAN Client information
netsh lan show interfaces > c:\MSLOG\%computername%_lan_interfaces.txt netsh lan show profiles > c:\MSLOG\%computername%_lan_profiles.txt netsh lan show settings > c:\MSLOG\%computername%_lan_settings.txt netsh lan export profile folder=c:\MSLOG\ - Save the logs stored in C:\MSLOG.
On NPS
- Create C:\MSLOG to store captured logs.
- Launch a command prompt as an administrator.
- Run the following commands.
- Environmental information and Group Policies application status:
gpresult /H C:\MSLOG\%COMPUTERNAME%_gpresult.txt msinfo32 /report c:\MSLOG\%COMPUTERNAME%_msinfo32.txt ipconfig /all > c:\MSLOG\%COMPUTERNAME%_ipconfig.txt route print > c:\MSLOG\%COMPUTERNAME%_route_print.txt- Event logs:
wevtutil epl Application c:\MSLOG\%COMPUTERNAME%_Application.evtx wevtutil epl System c:\MSLOG\%COMPUTERNAME%_System.evtx wevtutil epl Security c:\MSLOG\%COMPUTERNAME%_Security.evtx wevtutil epl Microsoft-Windows-GroupPolicy/Operational c:\MSLOG\%COMPUTERNAME%_GroupPolicy_Operational.evtx wevtutil epl Microsoft-Windows-CertificateServicesClient-CredentialRoaming/Operational c:\MSLOG\%COMPUTERNAME%_CertificateServicesClient-CredentialRoaming_Operational.evtx wevtutil epl Microsoft-Windows-CertPoleEng/Operational c:\MSLOG\%COMPUTERNAME%_CertPoleEng_Operational.evtx- Run the following 3 commands on Windows Server 2012 and later:
wevtutil epl Microsoft-Windows-CertificateServicesClient-Lifecycle-System/Operational c:\MSLOG\%COMPUTERNAME%_CertificateServicesClient-Lifecycle-System_Operational.evtx wevtutil epl Microsoft-Windows-CertificateServicesClient-Lifecycle-User/Operational c:\MSLOG\%COMPUTERNAME%_CertificateServicesClient-Lifecycle-User_Operational.evtx wevtutil epl Microsoft-Windows-CertificateServices-Deployment/Operational c:\MSLOG\%COMPUTERNAME%_CertificateServices-Deployment_Operational.evtx- Certificates store information
certutil -v -silent -store MY > c:\MSLOG\%COMPUTERNAME%_cert-Personal-Registry.txt certutil -v -silent -store ROOT > c:\MSLOG\%COMPUTERNAME%_cert-TrustedRootCA-Registry.txt certutil -v -silent -store -grouppolicy ROOT > c:\MSLOG\%COMPUTERNAME%_cert-TrustedRootCA-GroupPolicy.txt certutil -v -silent -store -enterprise ROOT > c:\MSLOG\%COMPUTERNAME%_TrustedRootCA-Enterprise.txt certutil -v -silent -store TRUST > c:\MSLOG\%COMPUTERNAME%_cert-EnterpriseTrust-Reg.txt certutil -v -silent -store -grouppolicy TRUST > c:\MSLOG\%COMPUTERNAME%_cert-EnterpriseTrust-GroupPolicy.txt certutil -v -silent -store -enterprise TRUST > c:\MSLOG\%COMPUTERNAME%_cert-EnterpriseTrust-Enterprise.txt certutil -v -silent -store CA > c:\MSLOG\%COMPUTERNAME%_cert-IntermediateCA-Registry.txt certutil -v -silent -store -grouppolicy CA > c:\MSLOG\%COMPUTERNAME%_cert-IntermediateCA-GroupPolicy.txt certutil -v -silent -store -enterprise CA > c:\MSLOG\%COMPUTERNAME%_cert-Intermediate-Enterprise.txt certutil -v -silent -store AuthRoot > c:\MSLOG\%COMPUTERNAME%_cert-3rdPartyRootCA-Registry.txt certutil -v -silent -store -grouppolicy AuthRoot > c:\MSLOG\%COMPUTERNAME%_cert-3rdPartyRootCA-GroupPolicy.txt certutil -v -silent -store -enterprise AuthRoot > c:\MSLOG\%COMPUTERNAME%_cert-3rdPartyRootCA-Enterprise.txt certutil -v -silent -store SmartCardRoot > c:\MSLOG\%COMPUTERNAME%_cert-SmartCardRoot-Registry.txt certutil -v -silent -store -grouppolicy SmartCardRoot > c:\MSLOG\%COMPUTERNAME%_cert-SmartCardRoot-GroupPolicy.txt certutil -v -silent -store -enterprise SmartCardRoot > c:\MSLOG\%COMPUTERNAME%_cert-SmartCardRoot-Enterprise.txt certutil -v -silent -store -enterprise NTAUTH > c:\MSLOG\%COMPUTERNAME%_cert-NtAuth-Enterprise.txt certutil -v -silent -user -store MY > c:\MSLOG\%COMPUTERNAME%_cert-User-Personal-Registry.txt certutil -v -silent -user -store ROOT > c:\MSLOG\%COMPUTERNAME%_cert-User-TrustedRootCA-Registry.txt certutil -v -silent -user -store -enterprise ROOT > c:\MSLOG\%COMPUTERNAME%_cert-User-TrustedRootCA-Enterprise.txt certutil -v -silent -user -store TRUST > c:\MSLOG\%COMPUTERNAME%_cert-User-EnterpriseTrust-Registry.txt certutil -v -silent -user -store -grouppolicy TRUST > c:\MSLOG\%COMPUTERNAME%_cert-User-EnterpriseTrust-GroupPolicy.txt certutil -v -silent -user -store CA > c:\MSLOG\%COMPUTERNAME%_cert-User-IntermediateCA-Registry.txt certutil -v -silent -user -store -grouppolicy CA > c:\MSLOG\%COMPUTERNAME%_cert-User-IntermediateCA-GroupPolicy.txt certutil -v -silent -user -store Disallowed > c:\MSLOG\%COMPUTERNAME%_cert-User-UntrustedCertificates-Registry.txt certutil -v -silent -user -store -grouppolicy Disallowed > c:\MSLOG\%COMPUTERNAME%_cert-User-UntrustedCertificates-GroupPolicy.txt certutil -v -silent -user -store AuthRoot > c:\MSLOG\%COMPUTERNAME%_cert-User-3rdPartyRootCA-Registry.txt certutil -v -silent -user -store -grouppolicy AuthRoot > c:\MSLOG\%COMPUTERNAME%_cert-User-3rdPartyRootCA-GroupPolicy.txt certutil -v -silent -user -store SmartCardRoot > c:\MSLOG\%COMPUTERNAME%_cert-User-SmartCardRoot-Registry.txt certutil -v -silent -user -store -grouppolicy SmartCardRoot > c:\MSLOG\%COMPUTERNAME%_cert-User-SmartCardRoot-GroupPolicy.txt certutil -v -silent -user -store UserDS > c:\MSLOG\%COMPUTERNAME%_cert-User-UserDS.txt- NPS configuration information:
netsh nps show config > C:\MSLOG\%COMPUTERNAME%_nps_show_config.txt netsh nps export filename=C:\MSLOG\%COMPUTERNAME%_nps_export.xml exportPSK=YES - Take the following steps to save an NPS accounting log.
- Open Administrative tools > Network Policy Server.
- On the Network Policy Server administration tool, select Accounting in the left pane.
- Click Change Log File Properties.
- On the Log File tab, note the log file naming convention shown as Name and the log file location shown in Directory box.
- Copy the log file to C:\MSLOG.
- Save the logs stored in C:\MSLOG.
Certification Authority (CA) (OPTIONAL)
- On a CA, launch a command prompt as an administrator. Create C:\MSLOG to store captured logs.
- Run the following commands.
- Environmental information and Group Policies application status
gpresult /H C:\MSLOG\%COMPUTERNAME%_gpresult.txt msinfo32 /report c:\MSLOG\%COMPUTERNAME%_msinfo32.txt ipconfig /all > c:\MSLOG\%COMPUTERNAME%_ipconfig.txt route print > c:\MSLOG\%COMPUTERNAME%_route_print.txt- Event logs
wevtutil epl Application c:\MSLOG\%COMPUTERNAME%_Application.evtx wevtutil epl System c:\MSLOG\%COMPUTERNAME%_System.evtx wevtutil epl Security c:\MSLOG\%COMPUTERNAME%_Security.evtx wevtutil epl Microsoft-Windows-GroupPolicy/Operational c:\MSLOG\%COMPUTERNAME%_GroupPolicy_Operational.evtx wevtutil epl Microsoft-Windows-CertificateServicesClient-CredentialRoaming/Operational c:\MSLOG\%COMPUTERNAME%_CertificateServicesClient-CredentialRoaming_Operational.evtx wevtutil epl Microsoft-Windows-CertPoleEng/Operational c:\MSLOG\%COMPUTERNAME%_CertPoleEng_Operational.evtx- Run the following 3 lines on Windows 2012 and up
wevtutil epl Microsoft-Windows-CertificateServicesClient-Lifecycle-System/Operational c:\MSLOG\%COMPUTERNAME%_CertificateServicesClient-Lifecycle-System_Operational.evtx wevtutil epl Microsoft-Windows-CertificateServicesClient-Lifecycle-User/Operational c:\MSLOG\%COMPUTERNAME%_CertificateServicesClient-Lifecycle-User_Operational.evtx wevtutil epl Microsoft-Windows-CertificateServices-Deployment/Operational c:\MSLOG\%COMPUTERNAME%_CertificateServices-Deployment_Operational.evtx- Certificates store information
certutil -v -silent -store MY > c:\MSLOG\%COMPUTERNAME%_cert-Personal-Registry.txt certutil -v -silent -store ROOT > c:\MSLOG\%COMPUTERNAME%_cert-TrustedRootCA-Registry.txt certutil -v -silent -store -grouppolicy ROOT > c:\MSLOG\%COMPUTERNAME%_cert-TrustedRootCA-GroupPolicy.txt certutil -v -silent -store -enterprise ROOT > c:\MSLOG\%COMPUTERNAME%_TrustedRootCA-Enterprise.txt certutil -v -silent -store TRUST > c:\MSLOG\%COMPUTERNAME%_cert-EnterpriseTrust-Reg.txt certutil -v -silent -store -grouppolicy TRUST > c:\MSLOG\%COMPUTERNAME%_cert-EnterpriseTrust-GroupPolicy.txt certutil -v -silent -store -enterprise TRUST > c:\MSLOG\%COMPUTERNAME%_cert-EnterpriseTrust-Enterprise.txt certutil -v -silent -store CA > c:\MSLOG\%COMPUTERNAME%_cert-IntermediateCA-Registry.txt certutil -v -silent -store -grouppolicy CA > c:\MSLOG\%COMPUTERNAME%_cert-IntermediateCA-GroupPolicy.txt certutil -v -silent -store -enterprise CA > c:\MSLOG\%COMPUTERNAME%_cert-Intermediate-Enterprise.txt certutil -v -silent -store AuthRoot > c:\MSLOG\%COMPUTERNAME%_cert-3rdPartyRootCA-Registry.txt certutil -v -silent -store -grouppolicy AuthRoot > c:\MSLOG\%COMPUTERNAME%_cert-3rdPartyRootCA-GroupPolicy.txt certutil -v -silent -store -enterprise AuthRoot > c:\MSLOG\%COMPUTERNAME%_cert-3rdPartyRootCA-Enterprise.txt certutil -v -silent -store SmartCardRoot > c:\MSLOG\%COMPUTERNAME%_cert-SmartCardRoot-Registry.txt certutil -v -silent -store -grouppolicy SmartCardRoot > c:\MSLOG\%COMPUTERNAME%_cert-SmartCardRoot-GroupPolicy.txt certutil -v -silent -store -enterprise SmartCardRoot > c:\MSLOG\%COMPUTERNAME%_cert-SmartCardRoot-Enterprise.txt certutil -v -silent -store -enterprise NTAUTH > c:\MSLOG\%COMPUTERNAME%_cert-NtAuth-Enterprise.txt certutil -v -silent -user -store MY > c:\MSLOG\%COMPUTERNAME%_cert-User-Personal-Registry.txt certutil -v -silent -user -store ROOT > c:\MSLOG\%COMPUTERNAME%_cert-User-TrustedRootCA-Registry.txt certutil -v -silent -user -store -enterprise ROOT > c:\MSLOG\%COMPUTERNAME%_cert-User-TrustedRootCA-Enterprise.txt certutil -v -silent -user -store TRUST > c:\MSLOG\%COMPUTERNAME%_cert-User-EnterpriseTrust-Registry.txt certutil -v -silent -user -store -grouppolicy TRUST > c:\MSLOG\%COMPUTERNAME%_cert-User-EnterpriseTrust-GroupPolicy.txt certutil -v -silent -user -store CA > c:\MSLOG\%COMPUTERNAME%_cert-User-IntermediateCA-Registry.txt certutil -v -silent -user -store -grouppolicy CA > c:\MSLOG\%COMPUTERNAME%_cert-User-IntermediateCA-GroupPolicy.txt certutil -v -silent -user -store Disallowed > c:\MSLOG\%COMPUTERNAME%_cert-User-UntrustedCertificates-Registry.txt certutil -v -silent -user -store -grouppolicy Disallowed > c:\MSLOG\%COMPUTERNAME%_cert-User-UntrustedCertificates-GroupPolicy.txt certutil -v -silent -user -store AuthRoot > c:\MSLOG\%COMPUTERNAME%_cert-User-3rdPartyRootCA-Registry.txt certutil -v -silent -user -store -grouppolicy AuthRoot > c:\MSLOG\%COMPUTERNAME%_cert-User-3rdPartyRootCA-GroupPolicy.txt certutil -v -silent -user -store SmartCardRoot > c:\MSLOG\%COMPUTERNAME%_cert-User-SmartCardRoot-Registry.txt certutil -v -silent -user -store -grouppolicy SmartCardRoot > c:\MSLOG\%COMPUTERNAME%_cert-User-SmartCardRoot-GroupPolicy.txt certutil -v -silent -user -store UserDS > c:\MSLOG\%COMPUTERNAME%_cert-User-UserDS.txt- CA configuration information
reg save HKLM\System\CurrentControlSet\Services\CertSvc c:\MSLOG\%COMPUTERNAME%_CertSvc.hiv reg export HKLM\System\CurrentControlSet\Services\CertSvc c:\MSLOG\%COMPUTERNAME%_CertSvc.txt reg save HKLM\SOFTWARE\Microsoft\Cryptography c:\MSLOG\%COMPUTERNAME%_Cryptography.hiv reg export HKLM\SOFTWARE\Microsoft\Cryptography c:\MSLOG\%COMPUTERNAME%_Cryptography.txt - Copy the following files, if exist, to C:\MSLOG: %windir%\CAPolicy.inf
- Log on to a domain controller and create C:\MSLOG to store captured logs.
- Launch Windows PowerShell as an administrator.
- Run the following PowerShell cmdlets. Replace the domain name in ";.. ,DC=test,DC=local"; with appropriate domain name. The example shows commands for ";test.local"; domain.PowerShell
Import-Module ActiveDirectory Get-ADObject -SearchBase ";CN=Public Key Services,CN=Services,CN=Configuration,DC=test,DC=local"; -Filter * -Properties * | fl * > C:\MSLOG\Get-ADObject_$Env:COMPUTERNAME.txt - Save the following logs.
- All files in C:\MSLOG on the CA
- All files in C:\MSLOG on the domain controller
0 comments: